グループビデオ通話を始める
PlanetKitを使用することで、1対1通話またはグループ通話のための音声およびビデオ通話機能をアプリに連携できます。このガイドでは、macOSアプリでグループビデオ通話の実装を開始する方法について説明します。
より迅速な開発のために、クイックスタートに基づいてアプリを実装できます。
前提条件
- 使用しているシステムがシステム要件を満たしていることを確認してください。
- API keyを作成してください。詳しくは、開発環境を参照してください。
- アクセストークンを作成するアプリサーバーコードを実装してください。詳しくは、アクセストークン作成方法を参照してください。
- Xcode 16以降をインストールしてください。
プロジェクト作成
Xcodeを開き、次のように新しいプロジェクトを作成します。
- [Welcome to Xcode]ウィンドウで[Create a new Xcode Project]をクリックします。
- [macOS]タブで[App]を選択し、[Next]をクリックします。
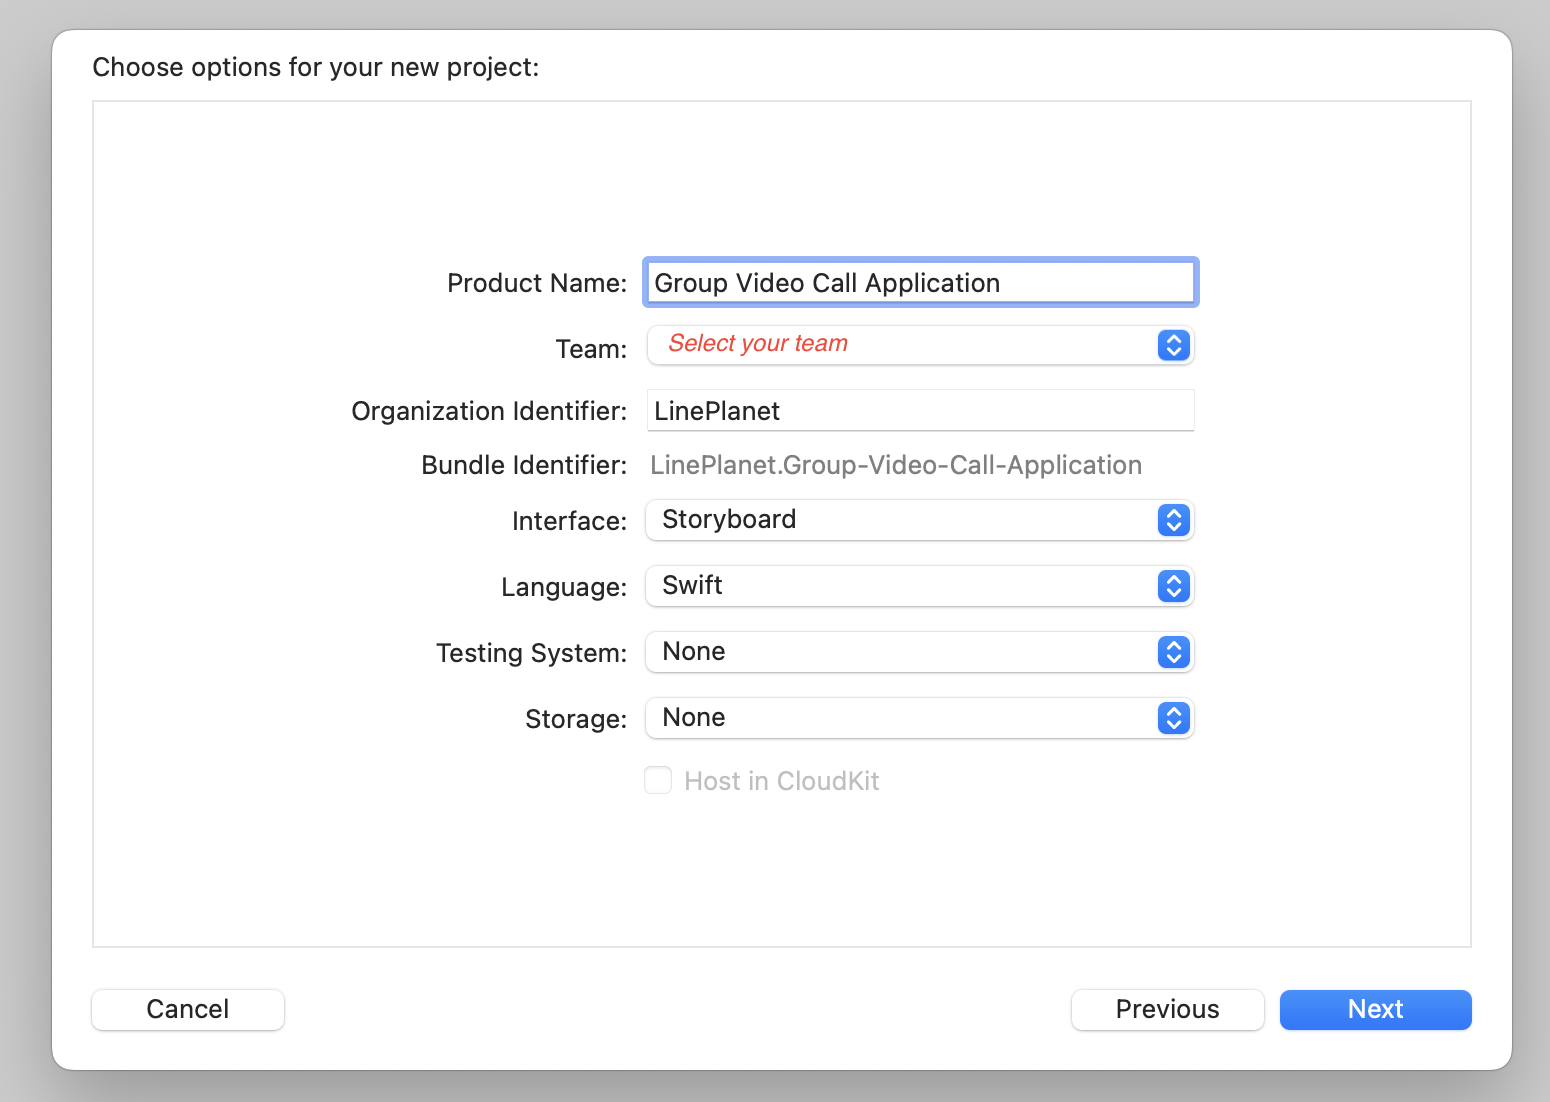
- プロジェクト作成ウィンドウで以下のように設定します。
- [Product Name]フィールドに製品名を入力します。
- [Team]フィールドで開発チームを選択します。
- [Organization Identifier]フィールドに組織識別子を入力します。
- [Interface]フィールドで[Storyboard]を選択します。
- [Next]をクリックします。
- プロジェクトが作成される場所を選択し、[Create]をクリックします。
SDKインストール
Swift Package Managerを使用してSDKをインストールします。
- Xcodeメニューバーで[File]>[Add Packages...]を選択します。
- [Search or Enter Package URL]フィールドにPlanetKitリポジトリURL(
https://github.com/line/planet-kit-apple)を入力します。 - [Add Package]ボタンをクリックします。
システム権限のリクエスト
ビデオ通話機能を有効にするには、ユーザーがアプリにマイクとカメラへのアクセス権限を与える必要があります。その手順を実行するには、次のように設定してください。
-
NSMicrophoneUsageDescriptionおよびNSCameraUsageDescriptionキーをアプリのInfo.plistファイルに追加します。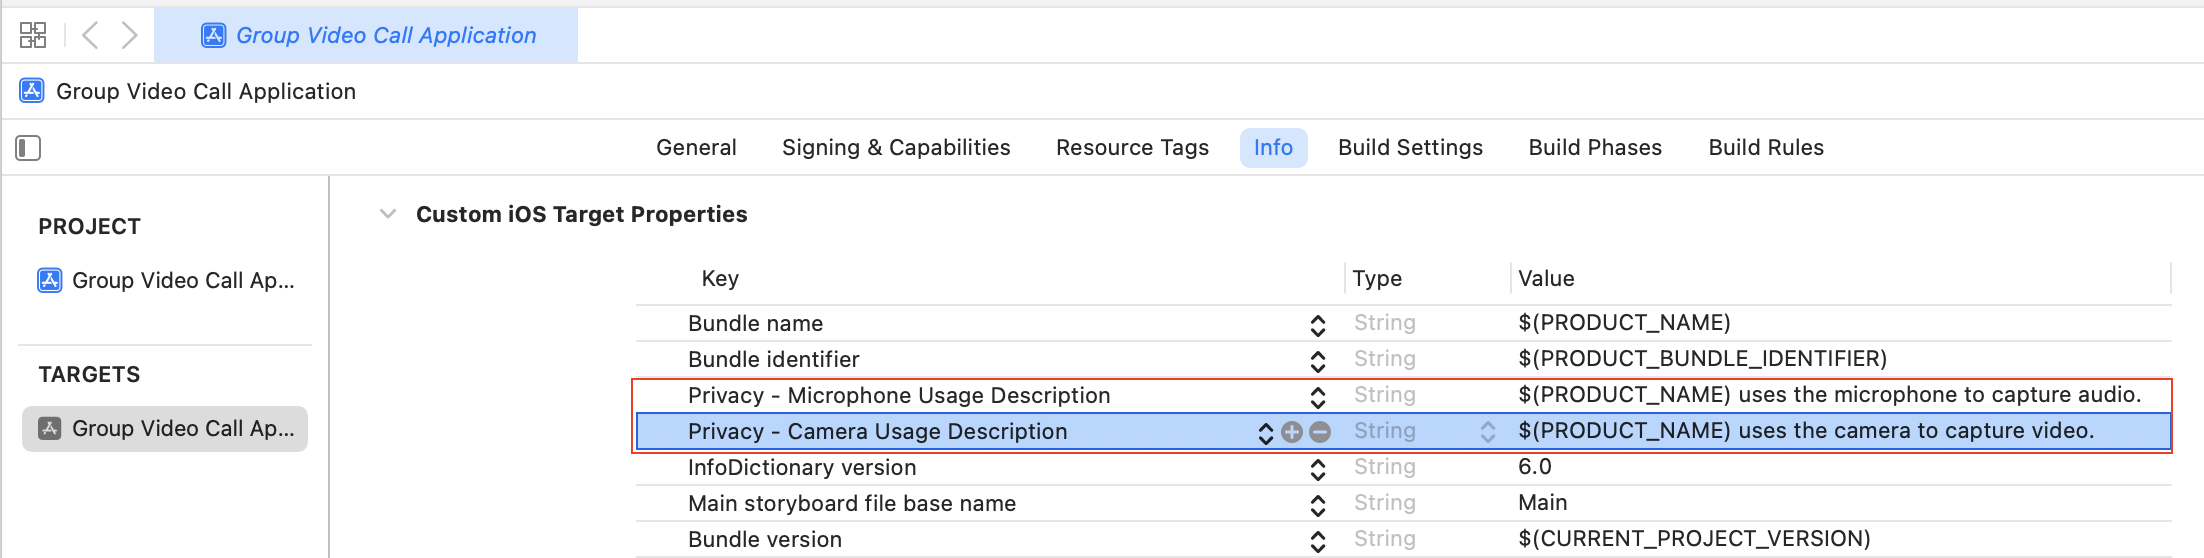
-
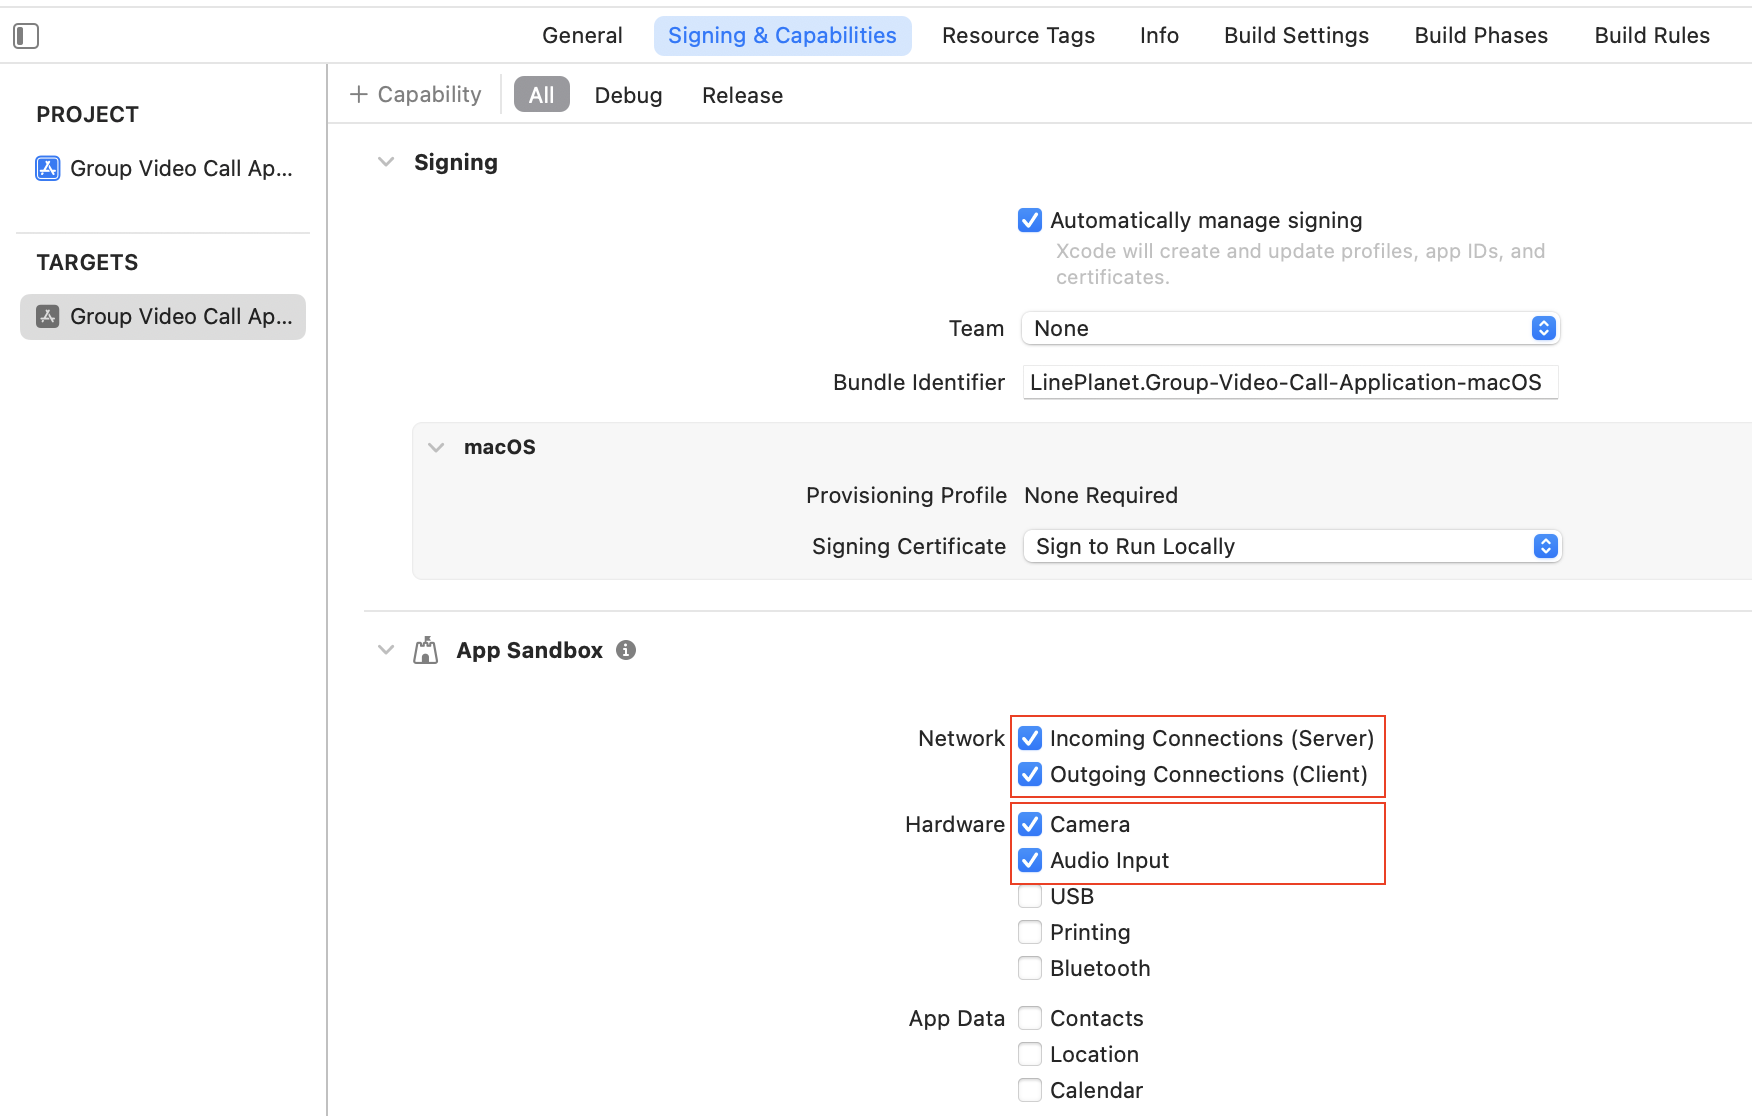
アプリターゲットの[Signing & Capabilities]で、次のApp Sandbox権限を有効にします。
- [Network]のIncoming Connections (Server)およびOutgoing Connections (Client)
- [Hardware]以下CameraおよびAudio Input
SDK初期化
PlanetKit APIを呼び出すには、まずPlanetKitを初期化する必要があります。PlanetKitInitialSettingBuilderオブジェクトでPlanetKitManagerのinitialize()を使ってPlanetKitを初期化します。
initialize()を呼び出すときは、PlanetKitInitialSettingBuilderオブジェクトにサーバーURL(planet_base_url)を設定する必要があります。利用している開発環境に応じて、適切なplanet_base_urlを使用してください。
// AppDelegate.swift

// Import PlanetKit SDK
import PlanetKit

PlanetKitManager.shared.initialize(initialSettings: PlanetKitInitialSettingBuilder()
    .withSetKitServerKey(serverUrl: planet_base_url)
    .build())
アプリでinitialize()メソッドを最初に一度呼び出す必要があります。NSApplicationDelegateを採用し遵守しているAppDelegateのapplicationDidFinishLaunching(_:)メソッドでSDKを初期化することをお勧めします。
アクセストークン取得
クライアントアプリからアプリサーバーにアクセストークンの作成をリクエストしてください。
joinConference()を呼び出す度に新しいアクセストークンを受け取って使用する必要があります。
グループビデオ通話の参加
グループビデオ通話に参加するには、以下のプロパティを含むPlanetKitConferenceParamオブジェクトでPlanetKitManagerのjoinConference()を呼び出します。
myUserId:ローカルユーザーのユーザーIDroomId:ルームIDroomServiceId:ルームのサービスIDdelegate:PlanetKitConferenceDelegateを採用し、準拠するイベントデリゲート(delegate)mediaType:ビデオ通話のために.audiovideoに設定accessToken:アクセストークン
import PlanetKit

class YourClass {
    func joinConference() {
        let param = PlanetKitConferenceParam(myUserId: myUserId, roomId: roomId, roomServiceId: serviceId, displayName: nil, delegate: self, accessToken: accessToken)
        param.mediaType = .audiovideo
        let result = PlanetKitManager.shared.joinConference(param: param, settings: nil)

        if (result.reason == PlanetKitStartFailReason.none && result.conference != null) {
            // The "result.conference" instance is the main instance to call APIs from now on.
            // You must keep it to control this call.
        }
        else {
            // Handle an error by referring to result.reason.
        }
    }
}

extension YourClass: PlanetKitConferenceDelegate {
    func didConnect(_ conference: PlanetKitConference, connected: PlanetKitConferenceConnectedParam) {
        // This is called when the call is connected.
        // Write your own code here.
    }

    func didDisconnect(_ conference: PlanetKitConference, disconnected: PlanetKitDisconnectedParam) {
        // This is called when the call is disconnected.
        // Write your own code here.
    }

    func peerListDidUpdate(_ conference: PlanetKitConference, updated: PlanetKitConferencePeerListUpdateParam) {
        // This is called when the list of peers is updated.
        // Write your own code here.
    }

    func peersVideoDidUpdate(_ conference: PlanetKitConference, updated: PlanetKitConferenceVideoUpdateParam) {
        // This is called when the video of one or more peers is updated.
        // Write your own code here.
    }
}
ユーザーがクライアントアプリでグループ通話ルームに参加するには、ルームのIDが必要なため、アプリケーションで定義した通信チャンネルを通じてルームIDを他のユーザーと共有する必要があります。
ローカルユーザーのためのビデオビュー追加
ローカルユーザーのためのビデオビューを追加するには、PlanetKitMTKView(myVideoView)を作成し、ローカルビューにサブビューとして追加した後、startPreview(delegate:)を使用してカメラプレビューのビデオストリームのデリゲートに設定します。
class YourViewController: NSViewController {
    ...

    private var myVideoView: PlanetKitMTKView = {
        PlanetKitMTKView(frame: .zero, device: nil)
    }()

    override func viewDidLoad() {
        super.viewDidLoad()

        view.addSubview(myVideoView)
        PlanetKitCameraManager.shared.startPreview(delegate: myVideoView)
    }

    override func viewDidDisappear() {
        super.viewDidDisappear()

        PlanetKitCameraManager.shared.stopPreview(delegate: myVideoView)
    }
}
ピアのためのビデオビュー追加
ピアのためのビデオビューを追加するには、PlanetKitMTKView(peerVideoView)を作成し、ピアビューにサブビューとして追加します。
class YourViewController: NSViewController {
    ...

    private var peerVideoView: PlanetKitMTKView = {
        PlanetKitMTKView(frame: .zero, device: nil)
    }()

    override func viewDidLoad() {
        super.viewDidLoad()

        view.addSubview(peerVideoView)
    }
}
各ピアに対するピアコントロールの作成
ピアリストが更新されたら、新たに追加されたピアに対してPlanetKitPeerControlを作成し、PlanetKitPeerControlDelegateオブジェクトを登録してください。PlanetKitPeerControlDelegateを使用して各ピアのステータス変更を処理できます。
class YourViewController: NSViewController {
    ...
    private var peerControl: PlanetKitPeerControl?

    private func showPeerVideo(_ peerId: String) {
        guard let peer = conference.getPeer(peerId: PlanetKitUserId(id: peerId, serviceId: serviceId)) else {
            // Handle an error by getting a peer instance.
            return
        }
        guard let peerControl = conference.createPeerControl(peer: peer) else {
            // Handle an error by creating peer control.
            return
        }
        self.peerControl = peerControl

        peerControl.register(self) { success in
            guard success else {
                // Handle an error by registering peer control.
                return
            }
            peerControl.startVideo(maxResolution: .recommended, delegate: self.peerVideoView) { success in
                if !success {
                    // Handle an error by starting video.
                }
            }
        }
    }
}
次のステップ
以下のドキュメントを参照して、PlanetKitが提供するさまざまな機能と各機能の詳しい使い方を確認してください。