グループビデオ通話を始める
PlanetKitを使用することで、1対1通話またはグループ通話のための音声およびビデオ通話機能をアプリに連携できます。このガイドでは、Androidアプリでグループビデオ通話の実装を開始する方法について説明します。
より迅速な開発のために、クイックスタートに基づいてアプリを実装できます。
前提条件
- 使用しているシステムがシステム要件を満たしていることを確認してください。
- API keyを作成してください。詳しくは、開発環境を参照してください。
- アクセストークンを作成するアプリサーバーコードを実装してください。詳しくは、アクセストークン作成方法を参照してください。
- Android Studioがまだインストールされていない場合は、Android Studioをインストールしてください。
プロジェクト作成
Android Studioを開き、次のように新しいプロジェクトを作成します。
- [Welcome to Android Studio]ウィンドウで[New Project]をクリックします。
- [Empty Activity]を選択し、[Next]をクリックします。
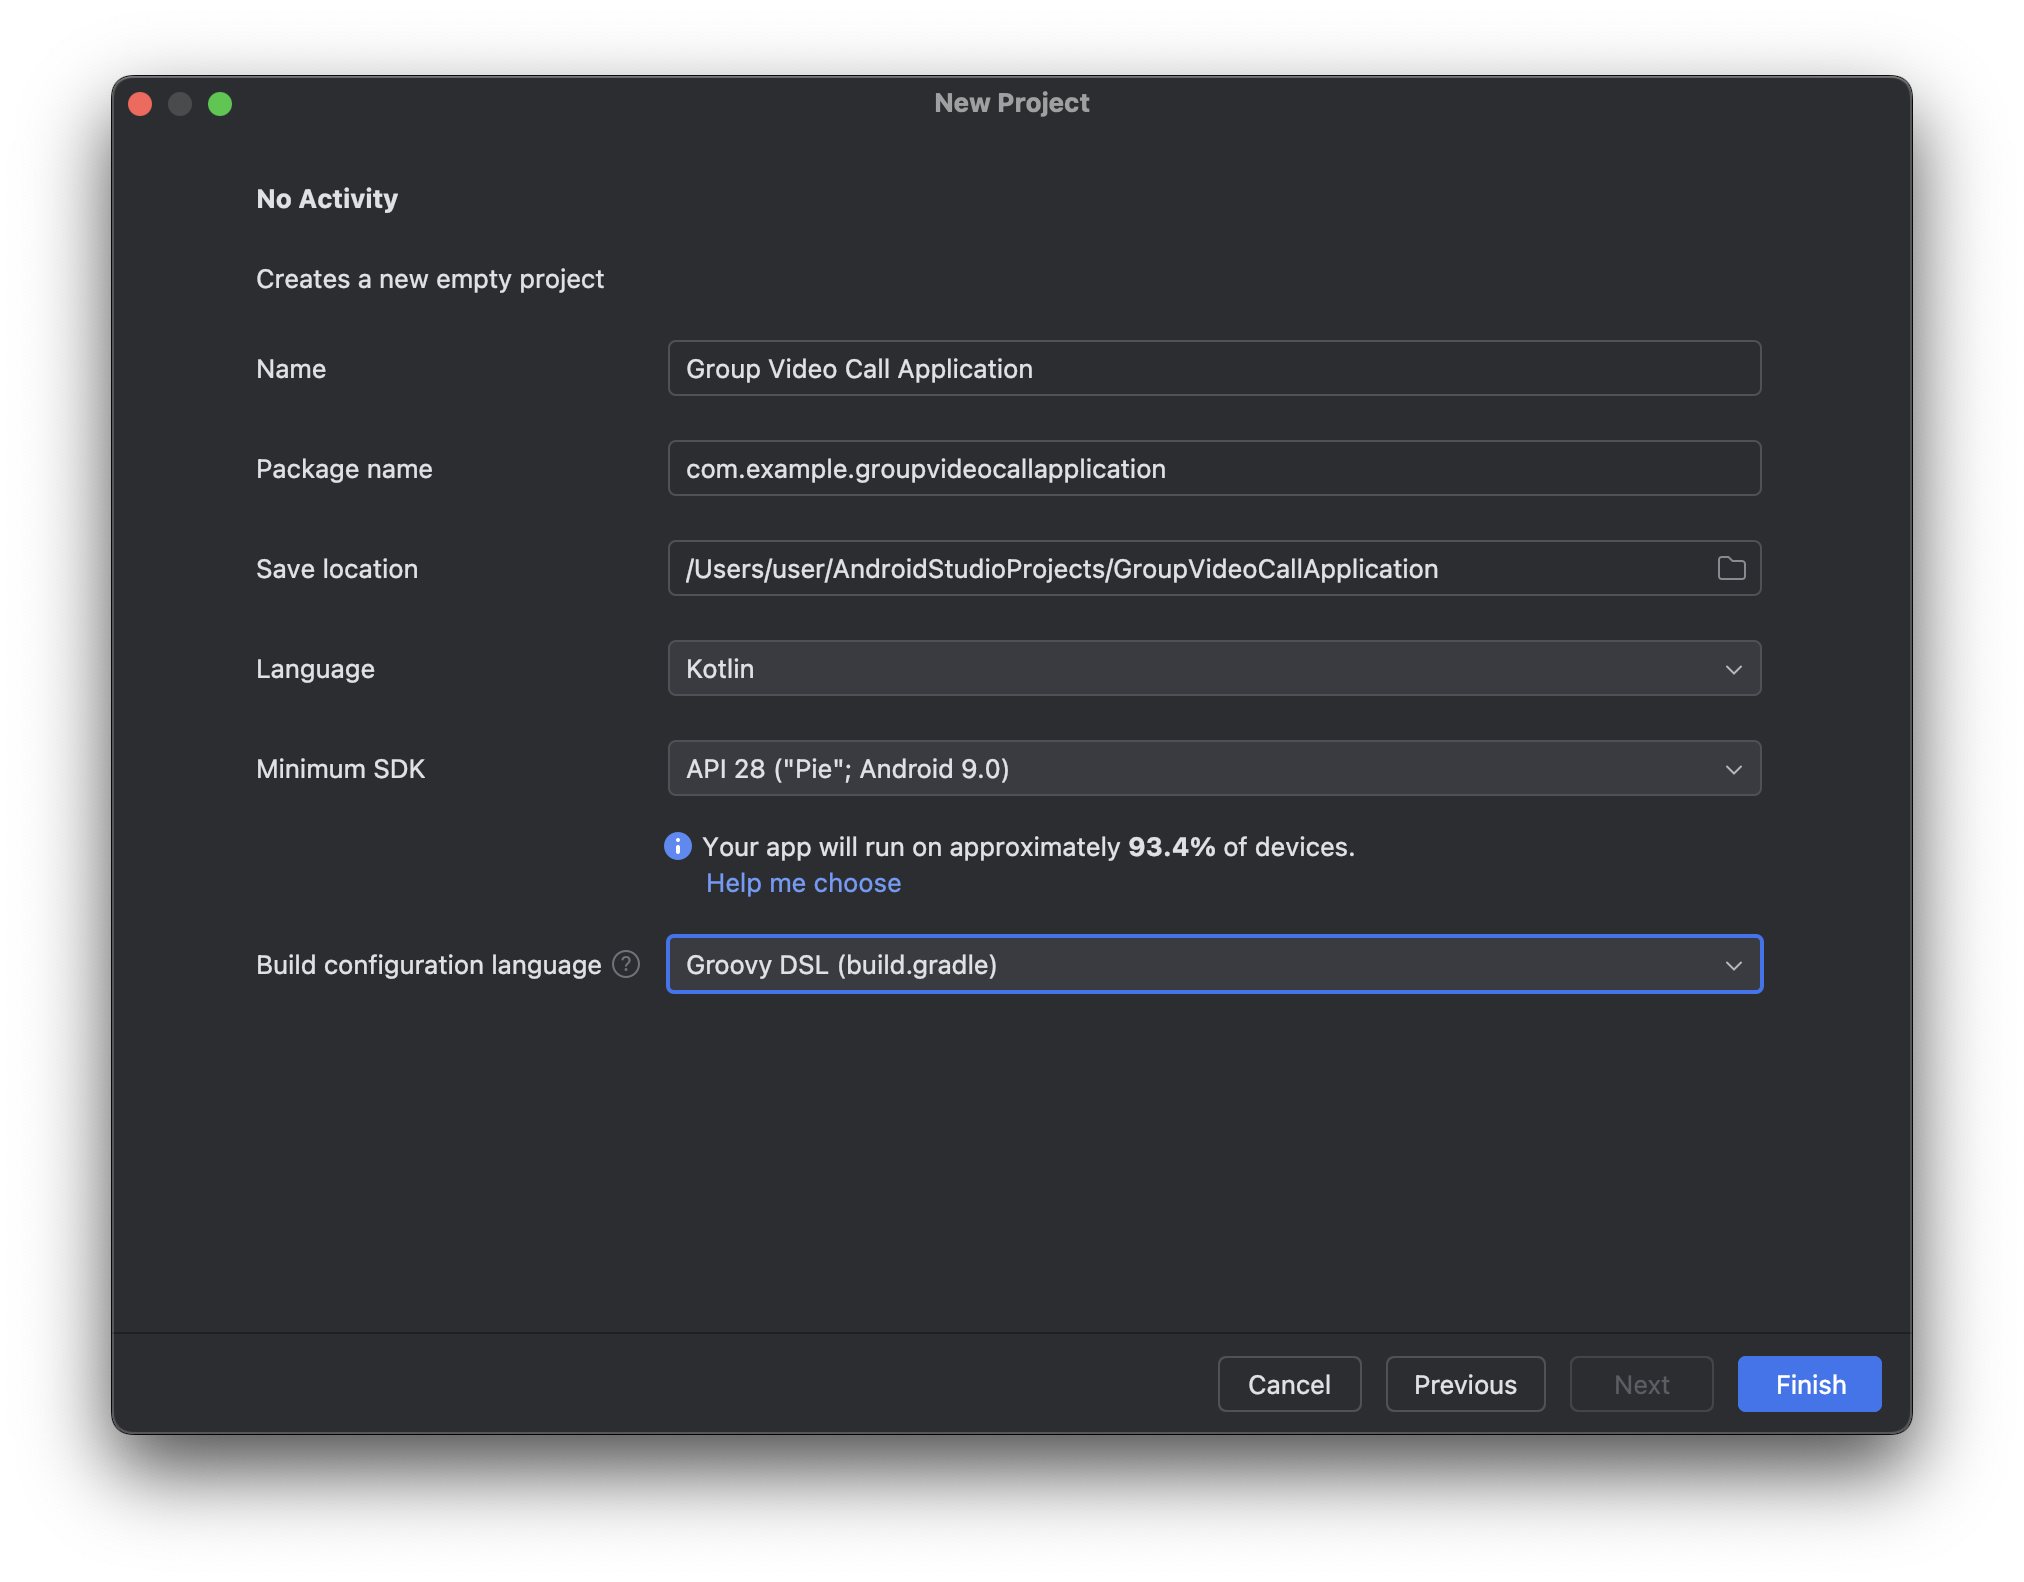
- [New Project]ウィンドウで以下のように設定します。
- [Name]フィールドにプロジェクト名を入力します。
- [Minimum SDK]でAPIレベル21以上を選択します。
- [Build configuration language]で「Groovy DSL (build.gradle)」を選択します。
- [Finish]をクリックします。
SDKインストール
Gradleを使用してSDKをインストールします。モジュールレベルのbuild.gradleファイルに以下の依存関係を追加してください。
dependencies {
    ...
    implementation 'com.linecorp.planetkit:planetkit:6.2.0'
    ...
}
Android向けPlanetKitのバージョン5.3.3以降は、Maven Central Repositoryでリリースされます。
プロジェクトにMaven Central Repositoryが設定されていない場合は、次のように設定してください。
// Root-level build.gradle
allprojects {
    repositories {
        mavenCentral()
    }
}
システム権限のリクエスト
ビデオ通話機能を有効にするには、Android向けPlanetKitにシステム権限が必要です。AndroidManifest.xmlファイルに次のように追加してください。
<uses-permission android:name="android.permission.INTERNET" />
<uses-permission android:name="android.permission.RECORD_AUDIO" />
<uses-permission android:name="android.permission.CAMERA" />
<uses-permission android:name="android.permission.READ_PHONE_STATE" />
<uses-permission android:name="android.permission.ACCESS_NETWORK_STATE" />
<uses-permission android:name="android.permission.WAKE_LOCK" />
<uses-permission android:name="android.permission.ACCESS_WIFI_STATE" />
<uses-permission android:name="android.permission.VIBRATE" />
<uses-permission android:name="android.permission.MODIFY_AUDIO_SETTINGS" />
<uses-permission android:name="android.permission.BLUETOOTH" android:maxSdkVersion="30"/>
<uses-permission android:name="android.permission.BLUETOOTH_CONNECT" />
ユーザーは、初めてアプリを起動するときに実行時の権限(ランタイム権限)を付与する必要があります。そのためには、次のようにRECORD_AUDIO、CAMERA、READ_PHONE_STATE、BLUETOOTH_CONNECT権限をリクエストします。
fun checkAllRequirePermissions(context: Context): MutableList<String> {
    val permissions: MutableList<String> = mutableListOf()

    if (ContextCompat.checkSelfPermission(context, Manifest.permission.RECORD_AUDIO)
            != PackageManager.PERMISSION_GRANTED) {
        permissions.add(Manifest.permission.RECORD_AUDIO)
    }

    if (ContextCompat.checkSelfPermission(context, Manifest.permission.CAMERA)
            != PackageManager.PERMISSION_GRANTED) {
        permissions.add(Manifest.permission.CAMERA)
    }

    if (ContextCompat.checkSelfPermission(context, Manifest.permission.READ_PHONE_STATE)
            != PackageManager.PERMISSION_GRANTED) {
        permissions.add(Manifest.permission.READ_PHONE_STATE)
    }

    if (Build.VERSION.SDK_INT >= Build.VERSION_CODES.S
            && ContextCompat.checkSelfPermission(context, Manifest.permission.BLUETOOTH_CONNECT)
                != PackageManager.PERMISSION_GRANTED) {
        permissions.add(Manifest.permission.BLUETOOTH_CONNECT)
    }
    return permissions
}

fun requestPermissions(activity: Activity, permissions: Array<String>) {
    ActivityCompat.requestPermissions(activity, permissions,0)
}

val requirePermissions = checkAllRequirePermissions(this)
if (requirePermissions.isNotEmpty()) {
    requestPermissions(this, requirePermissions.toTypedArray())
    return
}
ランタイム権限のリクエストの詳細については、Android公式ドキュメントを参照してください。
SDK初期化
PlanetKit APIを呼び出すには、まずPlanetKitを初期化する必要があります。PlanetKitConfigurationオブジェクトと共にPlanetKit.initialize()を使ってPlanetKitを初期化します。
PlanetKit.initialize()を呼び出す前に、PlanetKitConfigurationオブジェクトにサーバーURL(planet_base_url)を設定する必要があります。利用している開発環境に応じて、適切なplanet_base_urlを使用してください。
class GroupVideoCallApplication : Application() {
    override fun onCreate() {
        val config = PlanetKit.PlanetKitConfiguration.Builder(getApplicationContext())
            .setServerUrl(planet_base_url)
            .build()

        PlanetKit.initialize(config) { isSuccessful, isVideoHwCodecSupport, userAgent ->
            // Implement the completion callback if necessary
        }
    }
}
アプリでPlanetKit.initialize()メソッドを最初に一度呼び出す必要があります。ApplicationインスタンスのonCreate()メソッドでSDKを初期化することをお勧めします。
アクセストークン取得
クライアントアプリからアプリサーバーにアクセストークンの作成をリクエストしてください。
PlanetKit.joinConference()を呼び出す度に新しいアクセストークンを受け取って使用する必要があります。
グループビデオ通話の参加
グループビデオ通話に参加するには、次の引数でPlanetKit.joinConference()を呼び出します。
- 以下の属性を含む
PlanetKitConferenceParamオブジェクトmyId:ローカルユーザーのユーザーIDroomId:ルームIDmyServiceId:ローカルユーザーのサービスIDroomServiceId:ルームのサービスIDmediaType:ビデオ通話のためにPlanetKitMediaType.AUDIOVIDEOに設定accessToken:アクセストークン
- イベントコールバックが実装された
ConferenceListenerオブジェクト
fun joinConferenceExample(userId: String, roomId: String, serviceId: String, accessToken: String)
{
    val param = PlanetKitConferenceParam.Builder()
            .myId(userId)
            .roomId(roomId)
            .myServiceId(serviceId)
            .roomServiceId(serviceId)
            .accessToken(accessToken)
            .mediaType(PlanetKitMediaType.AUDIOVIDEO)
            .build()

    val result = PlanetKit.joinConference(param, conferenceListener = object : ConferenceListener {

        override fun onConnected(conference: PlanetKitConference,
                isVideoHwCodecEnabled: Boolean,
                isVideoShareModeSupported: Boolean) {
            // This is called when the call is connected.
            // Write your own code here.
        }

        override fun onDisconnected(conference: PlanetKitConference,
            param: PlanetKitDisconnectedParam) {
            // This is called when the call is disconnected.
            // Write your own code here.
        }

        override fun onPeerListUpdated(param: PlanetKitConferencePeerListUpdatedParam) {
            // This is called when the list of peers is updated.
            // Write your own code here.
        }

        override fun onPeersVideoUpdated(conference: PlanetKitConference, param: PlanetKitConferenceVideoUpdateParam) {
            // This is called when the video of one or more peers is updated.
            // Write your own code here.
        }
    })

    if (result.reason == PlanetKitStartFailReason.NONE && result.conference != null) {
        // The "result.conference" instance is the main instance to call APIs from now on.
        // You must keep it to control this call.
    }
    else {
        // Handle an error by referring to result.reason.
    }
}
ユーザーがクライアントアプリでグループ通話ルームに参加するには、ルームのIDが必要なため、アプリケーションで定義した通信チャンネルを通じてルームIDを他のユーザーと共有する必要があります。
ローカルユーザーに対するビデオビューレンダリング
ローカルユーザーのビデオを表示するには、PlanetKitMyViewコンポーネントを以下のように使用します。
PlanetKitMyViewとは?PlanetKitMyViewはPlanetKitで提供されるUIコンポーネントで、ローカルユーザーのビデオストリームをレンダリングします。このコンポーネントは以下の機能を処理します。
- ローカルユーザーのビデオレンダリング
- 最初のフレームのレンダリング検知
- ビデオ状態変更の通知
- リスナーインターフェースによるライフサイクルイベント管理
レイアウトでPlanetKitMyView宣言
レイアウトファイルでPlanetKitMyViewを宣言します。このビューは、通常次のようなUIオーバーレイで包まれています。
- ビデオなし(
no_video) - ビデオ再開(
video_resume)
<com.linecorp.planetkit.ui.PlanetKitMyView
    android:id="@+id/my_view"
    android:layout_width="match_parent"
    android:layout_height="match_parent" />
<!-- Overlays for video status -->
<LinearLayout android:id="@+id/no_video" ... />
<LinearLayout android:id="@+id/video_resume" ... />
...
ビューにカンファレンスをバインド
現在のカンファレンスインスタンスをPlanetKitMyViewにバインドし、リスナーを登録します。
fun setMe() {
    showNoVideoView()  // Default state before rendering
    PlanetKit.getConference()?.let {
        binding.myView.setMe(it, myViewListener)
    }
}
PlanetKitMyViewのリスナー実装
初期化、最初のフレームレンダリング、ビデオ状態のアップデートを処理するためにPlanetKitMyView.MyViewListenerを実装します。
onInitializedは、PlanetKitMyViewが準備できた時に呼び出されます。onRenderFirstFrameは、最初のビデオフレームがレンダリングされる時に呼び出されます。onVideoStatusUpdatedは、ビデオが有効化されているか無効化されているかを通知します。
private val myViewListener = object : PlanetKitMyView.MyViewListener {
    override fun onInitialized(userData: Any?) {
        val status = binding.myView.myVideoStatus
        when (status.videoState) {
            VideoState.DISABLED -> showNoVideoView()
            VideoState.ENABLED  -> showResumedView()
            else -> {}
        }
    }

    override fun onRenderFirstFrame() {
        binding.videoResume.isVisible = false
    }

    override fun onVideoStatusUpdated(videoStatus: PlanetKitVideoStatus) {
        when (videoStatus.videoState) {
            VideoState.DISABLED -> showNoVideoView()
            VideoState.ENABLED  -> showResumedView()
            else -> {}
        }
    }
}
ビデオ状態によるUI管理
ビデオ状態に応じてオーバーレイを表示または非表示にします。
- ビデオがオフになると、
noVideoオーバーレイを表示します。 - ビデオがオンになると、最初のフレームがレンダリングされるまで
videoResumeオーバーレイを表示し、その後非表示にします。
private fun showNoVideoView() {
    binding.videoResume.isVisible = false
    binding.noVideo.isVisible = true
}

private fun showResumedView() {
    binding.videoResume.isVisible = true
    binding.noVideo.isVisible = false
    binding.myView.resetFirstFrameRendered()
}
アクティビティでPlanetKitMyView処理
グループ通話が接続されると、カスタムビューのsetMe()を呼び出してPlanetKitMyViewを初期化します。
override fun onConnected(conference: PlanetKitConference, ...) {
    binding.simpleMyView.setMe()
}
ピアに対するビデオビューレンダリング
ピアのビデオを表示するには、PlanetKitPeerViewコンポーネントを以下のように使用します。
PlanetKitPeerViewとは?PlanetKitPeerViewはPlanetKitで提供されるUIコンポーネントで、グループ通話においてピアのビデオストリームをレンダリングします。このコンポーネントは以下の機能を処理します。
- 特定
PlanetKitConferencePeerのビデオレンダリング - 最初のフレームのレンダリング検知
- ビデオ状態変更の通知
- リスナーインターフェースによるライフサイクルイベント管理
レイアウトでPlanetKitPeerView宣言
レイアウトファイルでPlanetKitPeerViewを宣言します。このビューは、通常次のようなUIオーバーレイで包まれています。
- ビデオなし(
no_video) - ビデオ一時停止(
video_pause) - ビデオ再開(
video_resume)
<com.linecorp.planetkit.ui.PlanetKitPeerView
    android:id="@+id/peer_view"
    android:layout_width="match_parent"
    android:layout_height="match_parent" />
<!-- Overlays for video status -->
<LinearLayout android:id="@+id/no_video" ... />
<LinearLayout android:id="@+id/video_pause" ... />
<LinearLayout android:id="@+id/video_resume" ... />
...
ピアをビューにバインド
PlanetKitConferencePeerをPlanetKitPeerViewにバインドし、リスナーを登録します。
fun setUser(newConferencePeer: PlanetKitConferencePeer, userData: Any? = null) {
    PlanetKit.getConference()?.let {
        conferencePeer = newConferencePeer
        if (!binding.peerView.setPeer(it, newConferencePeer, peerViewListener, userData)) {
            Log.e(TAG, "Failed to set peer video")
        }
    }
}
PlanetKitPeerViewのリスナー実装
ビデオ状態およびピアの接続解除などの状態変更を管理するためにPlanetKitPeerView.PeerViewListenerを実装します。
onInitializedは、PlanetKitPeerViewが準備できた時に呼び出されます。onRenderFirstFrameは、最初のビデオフレームがレンダリングされる時に呼び出されます。onDisconnectedは、ピアが通話中に切断された時に呼び出されます。onVideoUpdatedは、ビデオが有効化されているか、一時停止されているか、無効化されているかを通知します。
private val peerViewListener = object : PlanetKitPeerView.PeerViewListener {
    override fun onInitialized(peer, userData) {
        updateVideo(peer.getVideoStatus(...).videoStatus)
    }

    override fun onRenderFirstFrame(peer) {
        // Hide all overlays
    }

    override fun onDisconnected(peer) {
        clearUser()
    }

    override fun onVideoUpdated(peer, videoStatus, subgroupName) {
        updateVideo(videoStatus)
    }
}
ビデオおよびUI制御
ピアのビデオ状態に応じてUIをアップデートします。
private fun updateVideo(videoStatus: PlanetKitVideoStatus) {
    when (videoStatus.videoState) {
        VideoState.DISABLED -> showNoVideoView()
        VideoState.ENABLED -> {
            startVideoImpl(binding.peerView)
        }
        VideoState.PAUSED -> showPausedView()
    }
}
ビデオが有効化されると、推奨解像度でビデオのレンダリングを開始します。
private fun startVideoImpl(peerView: PlanetKitPeerView) {
    showResumedView()
    peerView.startVideo(PlanetKitVideoResolution.RECOMMENDED, ..., callbacks)
    ...
}
アクティビティでのピアビュー処理
ビデオをレンダリングするピアが選択されると、カスタムビューのsetUser()を呼び出します。
binding.simplePeerView.setUser(selectedPeer)
ピアを削除してビュー状態を初期化するには、カスタムビューのclearUser()を呼び出します。
binding.simplePeerView.clearUser()
次のステップ
以下のドキュメントを参照して、PlanetKitが提供するさまざまな機能と各機能の詳しい使い方を確認してください。