Implement your first group audio call
PlanetKit lets you integrate audio and video call functionality for 1-to-1 calls or group calls into your app. This guide shows how to get started with the implementation of a group audio call in your Android app.
For faster development, you can implement your app on top of our quick start.
Prerequisites
- Make sure that your system meets the system requirements.
- Create an API key. For more information, see Development environment.
- Implement app server code to generate an access token. For more information, see How to generate access tokens.
- If Android Studio is not installed in your environment yet, install Android Studio.
Create a project
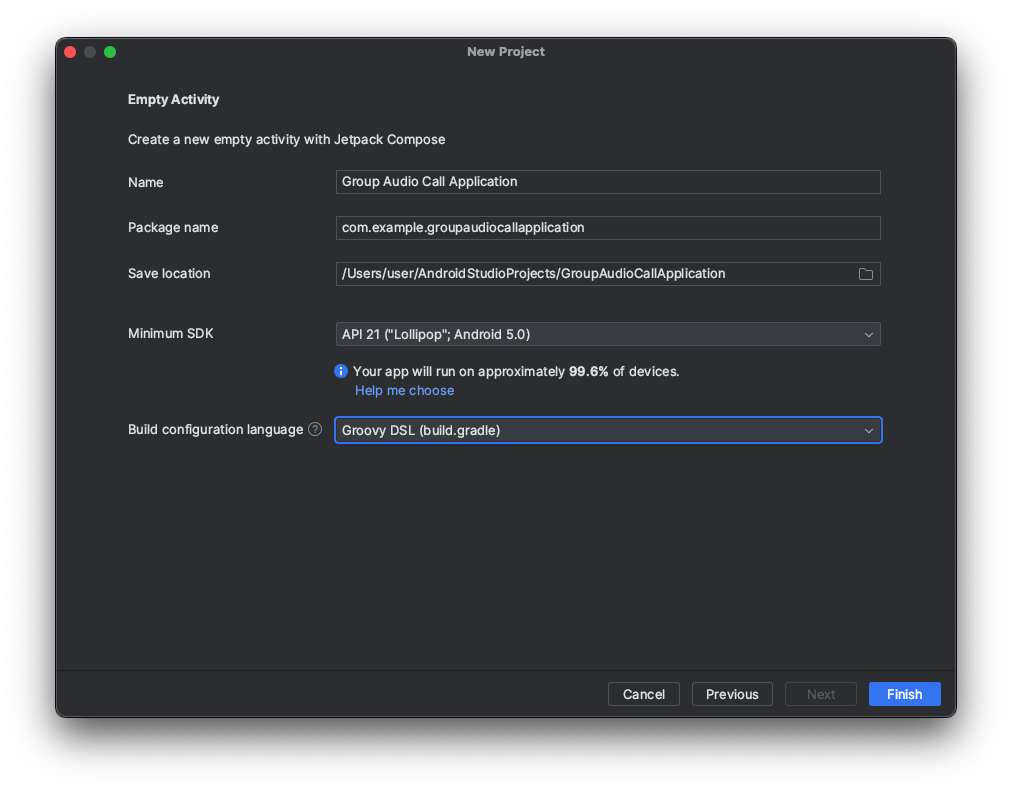
To get started, open Android Studio and create a new project as follows:
- Click New Project in the Welcome to Android Studio window.
- Select Empty Activity and click Next.
- In the New Project window, do the following.
- Enter your project name in the Name field.
- Select API level 21 or higher in Minimum SDK.
- Select "Groovy DSL (build.gradle)" in Build configuration language.
- Click Finish.
Install the SDK
Install the SDK using Gradle. Add the following dependency to your module-level build.gradle file:
dependencies {
    ...
    implementation 'com.linecorp.planetkit:planetkit:6.2.0'
    ...
}
Starting with version 5.3.3, PlanetKit for Android is distributed through the Maven Central Repository.
If the Maven Central Repository is not set up in your project, add the repository as follows:
// Root-level build.gradle
allprojects {
    repositories {
        mavenCentral()
    }
}
Request system permissions
To enable audio call functionality, PlanetKit for Android requires system permissions. The following permissions are included in AndroidManifest.xml of PlanetKit:
<uses-permission android:name="android.permission.INTERNET" />
<uses-permission android:name="android.permission.RECORD_AUDIO" />
<uses-permission android:name="android.permission.READ_PHONE_STATE" />
<uses-permission android:name="android.permission.ACCESS_NETWORK_STATE" />
<uses-permission android:name="android.permission.WAKE_LOCK" />
<uses-permission android:name="android.permission.ACCESS_WIFI_STATE" />
<uses-permission android:name="android.permission.VIBRATE" />
<uses-permission android:name="android.permission.MODIFY_AUDIO_SETTINGS" />
<uses-permission android:name="android.permission.BLUETOOTH" android:maxSdkVersion="30"/>
<uses-permission android:name="android.permission.BLUETOOTH_CONNECT" />
Users need to grant runtime permissions when they launch the app for the first time. To facilitate this process, request the RECORD_AUDIO, READ_PHONE_STATE, and BLUETOOTH_CONNECT permissions as follows.
fun checkAllRequirePermissions(context: Context): MutableList<String> {
    val permissions: MutableList<String> = mutableListOf()

    if (ContextCompat.checkSelfPermission(context, Manifest.permission.RECORD_AUDIO)
            != PackageManager.PERMISSION_GRANTED) {
        permissions.add(Manifest.permission.RECORD_AUDIO)
    }

    if (ContextCompat.checkSelfPermission(context, Manifest.permission.READ_PHONE_STATE)
            != PackageManager.PERMISSION_GRANTED) {
        permissions.add(Manifest.permission.READ_PHONE_STATE)
    }

    if (Build.VERSION.SDK_INT >= Build.VERSION_CODES.S
            && ContextCompat.checkSelfPermission(context, Manifest.permission.BLUETOOTH_CONNECT)
                != PackageManager.PERMISSION_GRANTED) {
        permissions.add(Manifest.permission.BLUETOOTH_CONNECT)
    }
    return permissions
}

fun requestPermissions(activity: Activity, permissions: Array<String>) {
    ActivityCompat.requestPermissions(activity, permissions,0)
}

val requirePermissions = checkAllRequirePermissions(this)
if (requirePermissions.isNotEmpty()) {
    requestPermissions(this, requirePermissions.toTypedArray())
    return
}
- For video calls, you must request the
CAMERApermission additionally. - For more information about requesting runtime permissions, see the Android official documentation.
Initialize the SDK
To call the PlanetKit APIs, you must initialize PlanetKit first. Initialize PlanetKit using PlanetKit.initialize() with a PlanetKitConfiguration object.
You must set the server URL (planet_base_url) in the PlanetKitConfiguration object before calling PlanetKit.initialize(). Make sure that you use an appropriate planet_base_url depending on the development environment that you're using.
class GroupAudioCallApplication : Application() {
    override fun onCreate() {
        val config = PlanetKit.PlanetKitConfiguration.Builder(getApplicationContext())
            .setServerUrl(planet_base_url)
            .build()

        PlanetKit.initialize(config) { isSuccessful, isVideoHwCodecSupport, userAgent ->
            // Implement the completion callback if necessary
        }
    }
}
The PlanetKit.initialize() method must be called once initially in your app. It is recommended to initialize the SDK in the onCreate() method of your Application instance.
Get the access token
In the client app, request your app server to generate an access token and get the generated access token.
You must get a new access token and use it each time you call PlanetKit.joinConference().
Join a group audio call
To join a group audio call, call PlanetKit.joinConference() with the following arguments:
PlanetKitConferenceParamobject, which includes the following properties:myId: Local user's user IDroomId: Room IDmyServiceId: Local user's service IDroomServiceId: Room service IDaccessToken: Access token
ConferenceListenerobject, which includes the implementation of event callbacks
fun joinConferenceExample(userId: String, roomId: String, serviceId: String, accessToken: String)
{
    val param = PlanetKitConferenceParam.Builder()
            .myId(userId)
            .roomId(roomId)
            .myServiceId(serviceId)
            .roomServiceId(serviceId)
            .accessToken(accessToken)
            .build()

    val result = PlanetKit.joinConference(param, conferenceListener = object : ConferenceListener {

        override fun onConnected(conference: PlanetKitConference,
                isVideoHwCodecEnabled: Boolean,
                isVideoShareModeSupported: Boolean) {
            // This is called when the call is connected.
            // Write your own code here.
        }

        override fun onDisconnected(conference: PlanetKitConference,
            param: PlanetKitDisconnectedParam) {
            // This is called when the call is disconnected.
            // Write your own code here.
        }

        override fun onPeerListUpdated(param: PlanetKitConferencePeerListUpdatedParam) {
            // This is called when the list of peers is updated.
            // Write your own code here.
        }
    })

    if (result.reason == PlanetKitStartFailReason.NONE && result.conference != null) {
        // The "result.conference" instance is the main instance to call APIs from now on.
        // You must keep it to control this call.
    }
    else {
        // Handle an error by referring to result.reason.
    }
}
Users need the room ID to enter the room from the client app, so the room ID must be shared with other users through an application-defined communication channel.
Next steps
See the following documents to learn more about the various features provided by PlanetKit and how to use each feature.
- Call flow: Familiarize yourself with the call flow for each call type.
- Subgroup: Read the guides on subgroups, which allows you to implement advanced features such as multi-subgroup rooms or translation rooms.
- Extended functions: Explore the guides on extended functions, such as screen share and data sessions.
- Code examples: See the code examples that you can use for implementing your own app.
- Reference: Refer to the API reference, API changelog, and release notes.